Serial Transfers: NC200s and PCs
Connecting an Amstrad NC Notebook to an Windows 98 PC
By Tim Surtell
The Amstrad Notepad and Notebook computers have at the rear a standard RS232 serial port which can be used to transfer files between the NC and any other computer that also has a serial port. A typical PC has two serial ports. They are commonly used to connect a mouse or a modem to the PC since these applications did not traditionally require the speed that other interfaces now provide.
The NC serial port has a 9-pin male D-type connector. A PC will normally have an identical connector, but it could have a 25-pin male D-type connector instead.
Haven't got a serial port on your PC? Click here to find out about using the USB port instead with a USB-to-serial converter.
Making the cable
The diagrams below show how a Null Modem serial cable should be wired up. Figure 1 shows the connections for the 9-pin to 9-pin cable. You will need to buy two 9-pin female D-type connectors. Figure 2 shows the connections for the 9-pin to 25-pin cable. You will need to buy one 9-pin female D-type connector and one 25-pin female D-type connector. In both cases you will find that all the pin numbers will be marked on the connectors. Of course, you could buy a ready-made cable if you wish.
| NC Signal Name | NC Serial Port
From pin number |
PC Serial Port
To pin number |
| RX | 2 | 3 |
| TX | 3 | 2 |
| DTR | 4 | 6 |
| GND | 5 | 5 |
| RTS | 7 | 8 |
| CTS | 8 | 7 |
Figure 1: Wiring for a 9-pin to 9-pin serial cable. Connectors viewed from rear.
| NC Signal Name | NC Serial Port
From pin number |
PC Serial Port
To pin number |
| RX | 2 | 2 |
| TX | 3 | 3 |
| DTR | 4 | 6 |
| GND | 5 | 7 |
| RTS | 7 | 5 |
| CTS | 8 | 4 |
Figure 2: Wiring for a 9-pin to 25-pin serial cable. Connectors viewed from rear.
Making the connection
The following section assumes that you are using a Microsoft Windows 98 PC and an Amstrad NC200 Notebook computer. Even if you are not, you will find the information below is relevant to users of other machines/operating systems.
On the PC, a program called HyperTerminal is used for serial transfers. You should find this under Start... Programs... Accessories... Communications...HyperTerminal. If it is not, you will need to install it from your Windows disk.
Windows Vista does not include HyperTerminal, but you can download it here. To install it, simply extract the files and place them in the Windows System32 folder (normally C:\Windows\System32). Then run the hypertrm.exe program by double-clicking on it.
Alternatively, there is also a free program called Tera Term Pro which you can download by clicking here.
When you click on HyperTerminal, Windows Explorer opens as shown below...
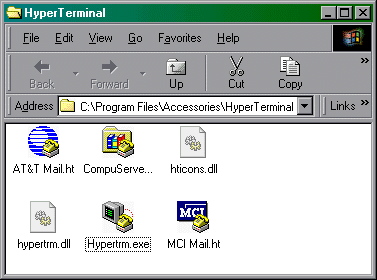
Figure 3: HyperTerminal folder in Explorer
HyperTerminal allows you to create an icon for each connection that you require. As you can see, some are already set up for modem transfers. You want to make a new one, so you should double click hyertrm.exe...
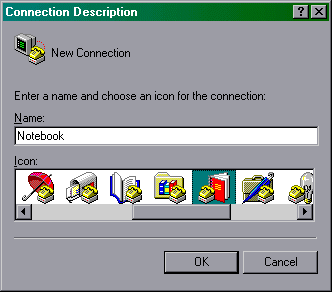
Figure 4: HyperTerminal Connection Description dialogue
After the splash screen has finished, you will see the screen above. You can enter a name for your new connection. Call it Notepad or Notebook select an icon if you wish, and click OK.
Now have a look at the options under Connect using. You should see Direct to COM1, Direct to COM2 etc. These are your serial ports, so select the one that you have the cable connected to (this may have to be trial and error if your ports are not marked!). Click OK.
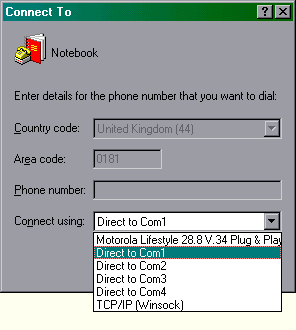
Figure 5: HyperTerminal Connect To dialogue
To make a serial connection work, both computers need to have the same communication settings. The screen before you now lets you set up the Bits per second (baud rate), Data bits, Parity, Stop bits and Flow control. To start with, set these as shown in the screen-shot and click OK.
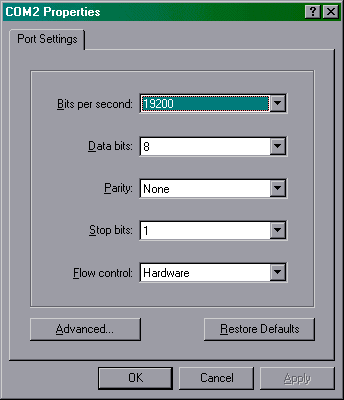
Figure 6: HyperTerminal Serial Port Properties dialogue
You should now save these settings by going to File... Save, as you should do whenever you change any settings. This enables you to use the Notepad or Notebook icon that you set up earlier next time you want to run the program, and the settings will not need to be set up again.
Now back to the Notebook...
From the Notebook main menu, press Function and S to run the Serial Terminal Program.

Figure 7: NC200 Serial Terminal Program
Press Menu for the Serial Terminal Program options, and press C to configure the program. Change the settings to those shown below...

Figure 8: NC200 Serial Terminal Program Configuration screen
For serial transfers to work, the settings on both computers need to be the same (as the above settings sections are), so when you change a setting on one computer, you need to change the same setting on the other computer.
Now press Stop and you should see the screen clear and a cursor appear in the top left corner. If the serial link is working you should now be able to type characters on the NC and see them appear on the PC's screen, and vice versa. If the link does not work, either the settings are not the same, the baud rate is too high, or the cable is faulty. If characters appear, but they are incorrect, check the baud rate and try lowering it.
If the link works, you can now try transferring files.
Transferring files from the NC to the PC
On the PC, go to Transfer...Receive file or click the Receive button on the HyperTerminal toolbar.
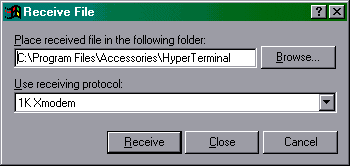
Figure 9: HyperTerminal Receive File dialogue
The default location for the incoming file is the HyperTerminal folder, but you can change this by clicking Browse. The Receiving protocol should be set to 1K Xmodem. Click Receive.
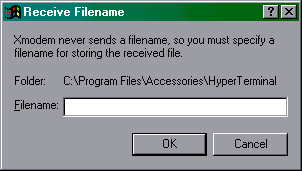
Figure 10: HyperTerminal Receive Filename dialogue
Type in a filename for the incoming file (remembering appropriate extensions since the type of file cannot be determined from the file itself), but do not click OK just yet.
On the NC, press Menu to return to the Serial Terminal Program menu. Press S to send a file and use the cursor keys to select the file you want to transfer.
Click OK (or press Enter) on the PC and then press Enter on the NC to start the PC receiving and the NC sending. If you want to cancel a transfer, press Stop on the NC and Escape on the PC.
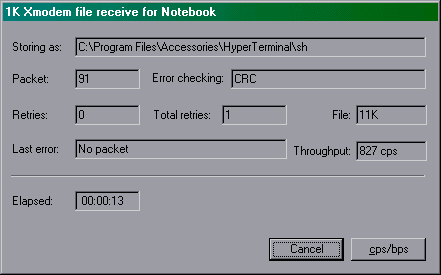
Figure 11: HyperTerminal receive file progress screen

If all goes well, you should see the progress of the transfer. A 20kb file will take about 15 seconds to transfer. If the transfer does not work, try again as it does not always work first time. If it never works, try changing the baud rate setting (press Menu and then C on the NC, Go to File...Properties and click Configure on the PC.)
Transferring files from the PC to the NC
On the PC, go to Transfer...Send file or click the Send button on the HyperTerminal toolbar.
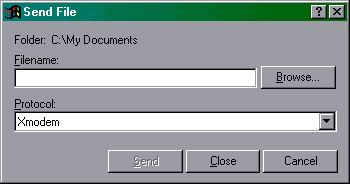
Figure 12: NC200 Serial Terminal Program send file progress screen
Type in the path and filename of the file you wish to send, or use Browse to select a file. The Protocol should be set to Xmodem. Do not click Send just yet.
On the NC, press Menu to return to the Serial Terminal Program menu. Press R to receive a file and use the cursor keys to select a file to overwrite, or select New file to type in a filename for the new file.
Press Enter on the NC and then click OK (or press Enter) on the PC to start the PC sending and the NC receiving. If you want to cancel a transfer, press Stop on the NC and Escape on the PC.
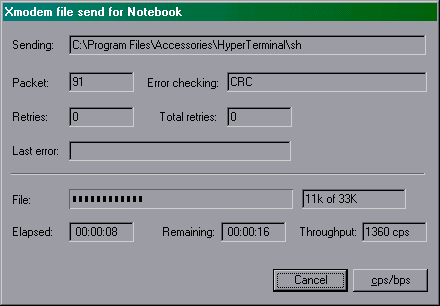
Figure 14: HyperTerminal send file progress screen

Figure 15: NC200 Serial Terminal Program receive file progress screen
If all goes well, you should see the progress of the transfer. A 20kb file will take about 15 seconds to transfer. If the transfer does not work, try again as it does not always work first time. If it never works, try changing the baud rate setting (press Menu and then C on the NC, Go to File...Properties and click Configure on the PC.)
HyperTerminal also has some other options on the Transfer menu:
-
Capture text will save all the text that is sent from a computer into a file. If the same file is used again, text will be appended to the file. No transfer protocol is used.
-
Send text file sends a file as ordinary text without using a transfer protocol.
| © 1997 – 2026 Tim Surtell | Tim's Amstrad NC Users' Site |
| Home | Features | Data Sheets | Questions | BBC BASIC | Software |