![]()
Serial Transfers: NCs and Mac OS X
Connecting an Amstrad NC100 Notepad to an Apple Macintosh running OS X
By Gavin Taylor
Despite the Mac's big switch to UNIX and USB you can still connect your Notepad and exchange files. (If you have an NC200 your Mac can read and write the floppy disks without problems).
What you need
- A USB to serial converter.
- A null modem cable.
- A terminal program.
1. A USB to serial converter
I use the very common Keyspan two-port USB to serial converter (www.keyspan.com). There are numerous others on the market (including PCI cards) that would probably work equally well. You also need to install the latest software driver for the device (widely available on CD and downloadable).
2. A null modem cable
It is advisable switch off your Notepad before plugging or unplugging the serial cable.
I have never seen a Mac to PC null modem serial cable on sale, but they may well exist. One way to achieve this set up is to use a normal Mac serial modem cable (becoming rare but still available) combined with a standard PC null modem serial cable. I suggest taking both your Mac modem cable (if you already have one) and the Amstrad with you to the shop so that you can make sure all the sizes and plug "genders" are correct. Alternatively you can make your own cable by following the instructions below.
Making a cable
You need a fine point soldering iron, the relevant plugs, some cable, a test meter, and a steady hand, because soldering the 8 pin Mac minidin is very fiddly. I bought a PC null modem cable and then simply cut off the PC end, savage perhaps, but it saves you soldering the Pad-end plug, and you know for sure that you have the right type of cable (it does mean that you have to use the test meter to identify which wire hanging out the cut end is connected to which pin on the Pad-end).
When you use the pin numbering diagrams, note that the view is looking into the cable plug from the front (as if you were about to plug it into your face). This is important because when you are soldering (in particular the Mac minidin) you are looking at the plugs the wrong way round. Also note that sometimes two wires from the Pad-end have to be joined to just one pin on the Mac-end plug.
When I had 'finished' I found that my soldered wires kept shorting, either with each other or with the external plug shield (I discovered this with the test meter). The solution was to feed very fine insulation between the wires and then around the whole lot before sliding on the plug cover. I used sellotape for reduced bulk.
| NC Serial Plug | Mac Serial Plug | |
| front view |
|
|
| Nominal colour | From pin number | To pin number |
| Red | 1 | |
| Orange | 2 | 5 |
| Green | 3 | 3 |
| Yellow | 4 | 1 |
| Black | 5 | 4 |
| Violet | 6 | 2 |
| Blue | 7 | 1 |
| Violet | 8 | 2 |
| Brown | 9 |


3. A terminal program
UNIX experts might prefer to use OS X's built-in terminal program, but the easy option is to use an old-style terminal emulator. The Appleworks bundleware suite no longer includes one, but fortunately the excellent shareware program ZTerm is now available for System X (homepage.mac.com/dalverson/zterm/) and is used here (please support shareware!).
Making the connection
- Setting up the Notepad terminal.
- Setting up the Mac terminal emulator.
- Transferring files Notepad to Mac.
- Transferring files Mac to Notepad.
1. Setting up the Notepad terminal
Switch on the Notepad and Press Function + S to open the terminal. Press the Secret/Menu key and set as shown below (the first three Printer settings are irrelevant).

Press Stop repeatedly to arrive at the initial page. Press Secret/Menu. Move down to the "Document transfer port and format" item and select Serial/ASCII (use the sideways arrows to change).
2. Setting up the Mac terminal emulator
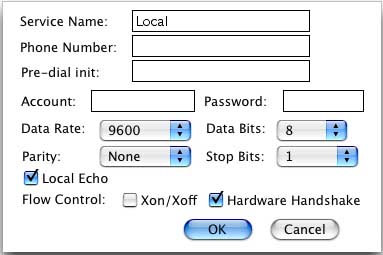
Open ZTerm. In the Settings menu select Connection and set as shown below.
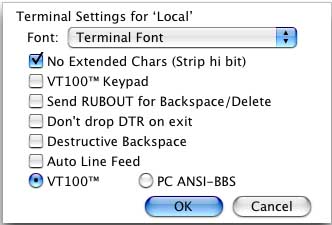
In the Settings menu select Terminal and set as shown below.
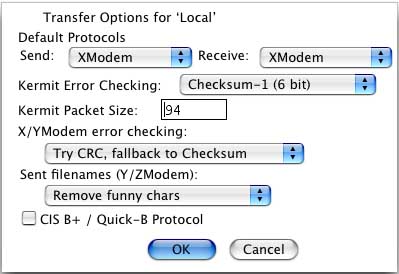
In the Settings menu select Transfer Options and set as shown below.
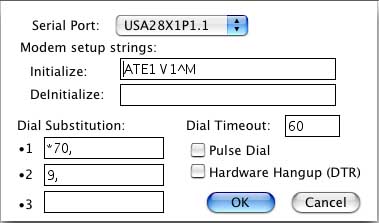
In the Settings menu select Modem Preferences and set as shown below. The important thing here is to select the correct Serial Port, which may be named differently on your system.
There are various other options in the Settings menu. Note the Receive Folder - this is where your files will go when they arrive from the Notepad.
The machines should now be ready to communicate. The settings given above are simply one combination that works. There are numerous other possibilities, but bear in mind that changes you make on one side of the link normally have to be matched on the other side.
3. Transferring files Notepad to Mac
- On the Notepad:
- Press Function + L
- Move the cursor onto the file you want to transfer
- Press Secret/Menu
- Press T Transfer functions
- Press X
- On the Mac (ZTerm should be set up and running):
- In ZTerm: File menu Receive XModem
- Name the file when requested
4. Transferring files Mac to Notepad
Remember that your notepad has strict limitations in storage space and file size (see Notepad Manual).
- On the Notepad:
- Press Function + L
- Press Secret/Menu
- Press T Transfer functions
- Press M
- Name the document but DO NOT press Return yet
- On the Mac:
- In ZTerm: File menu Send XModem
- Navigate to the file you want to transfer and select it
- Go back to the Notepad
- Back on the Notepad:
- Press Return
Final notes
Don't be surprised if it doesn't work first time. Keep trying, checking one variable at a time.
To suggest improvements or ask advice contact Gavin Taylor gtaylor@libero.it (06/01/2003)
| © 1997 – 2026 Tim Surtell | Tim's Amstrad NC Users' Site |
| Home | Features | Data Sheets | Questions | BBC BASIC | Software |